
Private Infrastructure lets you connect Outlook mailboxes through your own Microsoft Azure AD OAuth app instead of ColdSend's shared app. You control the credentials, satisfy security and compliance reviews, and sign every authentication request with your own app ID — boosting trust and mailbox reputation.
When to Use Private OAuth
Use this option if you:
- Need a custom-branded OAuth consent screen (your company name, not ColdSend's)
- Have compliance or security requirements that mandate your own OAuth app
- Want higher API quotas tied to your own Azure AD tenant
- Are managing mailboxes for clients or team members under your organization's identity
Looking for a quicker setup? If you don't need your own OAuth app, ColdSend Shared lets you connect in under a minute with no Azure configuration.
Prerequisites
- A Microsoft Azure account (free tier works — create one here)
- Access to the Azure Portal with permission to register applications
- A ColdSend account
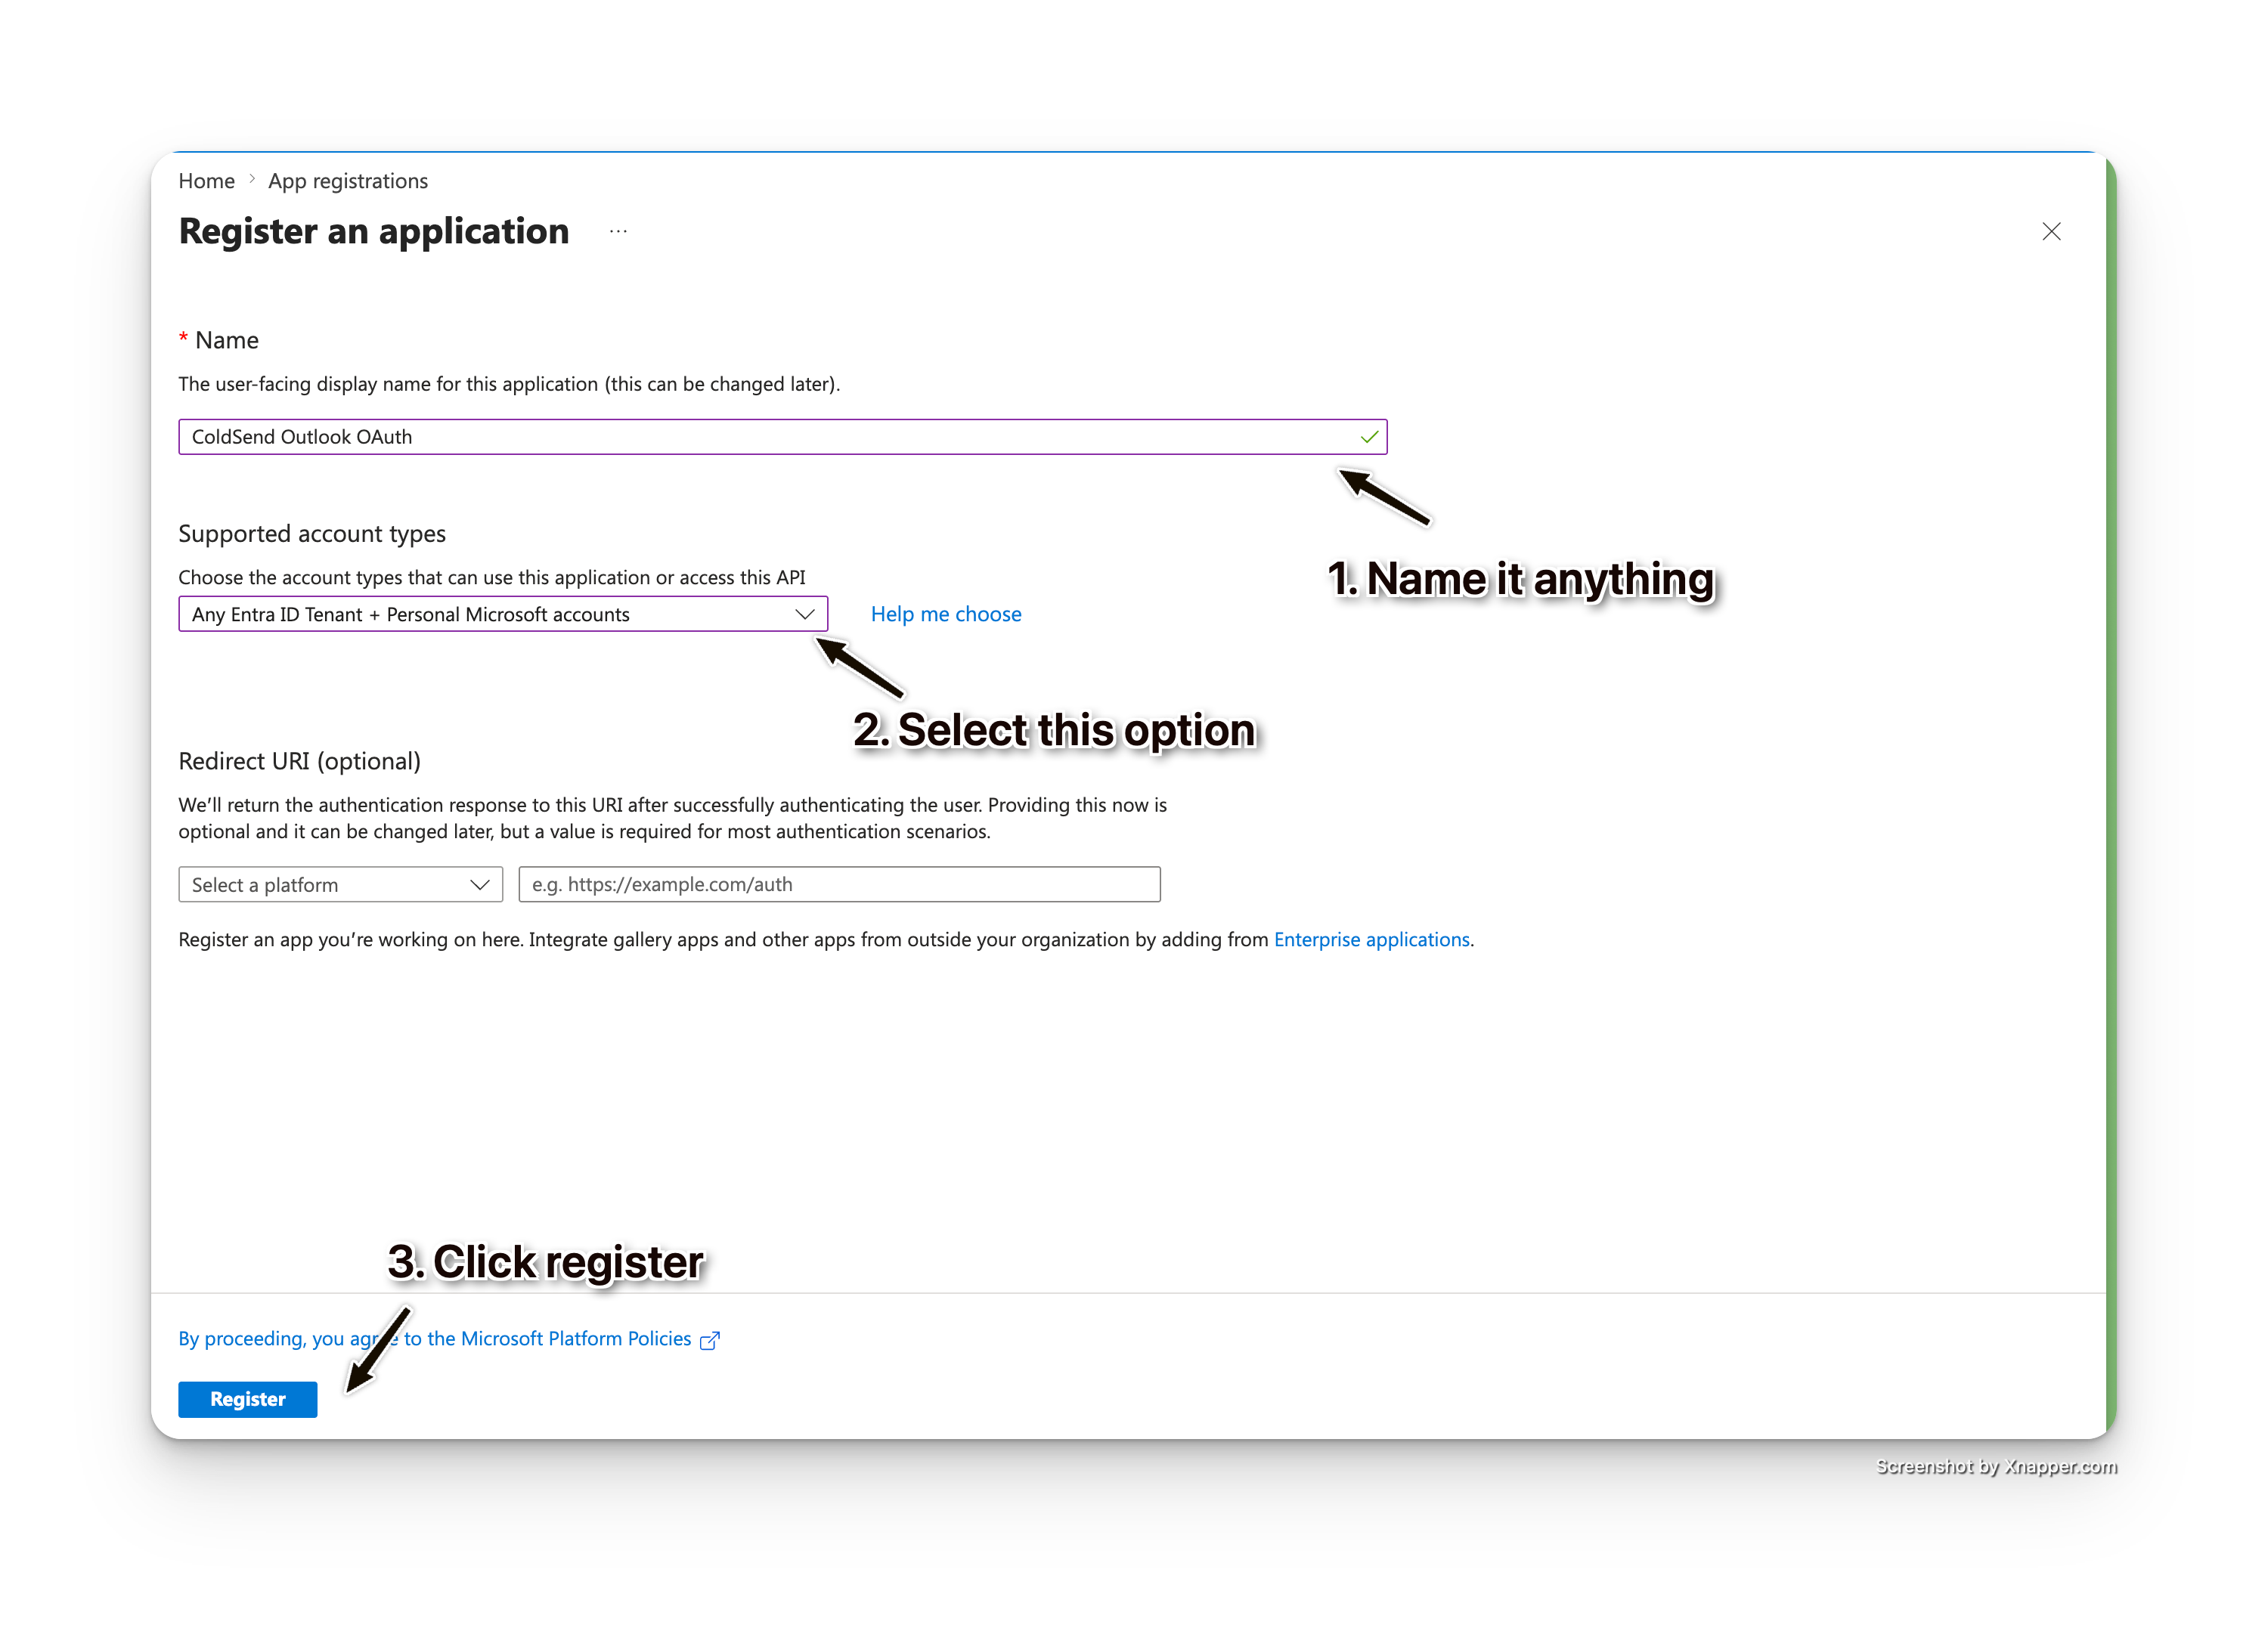
Step 1: Register a New Application in Azure
- Go to the Azure Portal.
- In the top search bar, type App registrations and select it.
- Click + New registration.
- Fill in the details:
- Name: Give your app a recognizable name (e.g.,
ColdSend Outlook OAuth) - Supported account types: Select Accounts in any organizational directory (Any Microsoft Entra ID tenant - Multitenant) and personal Microsoft accounts
- Name: Give your app a recognizable name (e.g.,
- Leave the Redirect URI empty for now (we'll add it in Step 2).
- Click Register.
Step 2: Add Redirect URI
After registration, you'll land on your app's Overview page.
In the left sidebar, click Authentication.
Under Platform configurations, click + Add a platform.
Select Web.
Under Redirect URIs, enter:
https://cloud.coldsend.pro/client/email-accounts/oauth/callbackClick Configure.
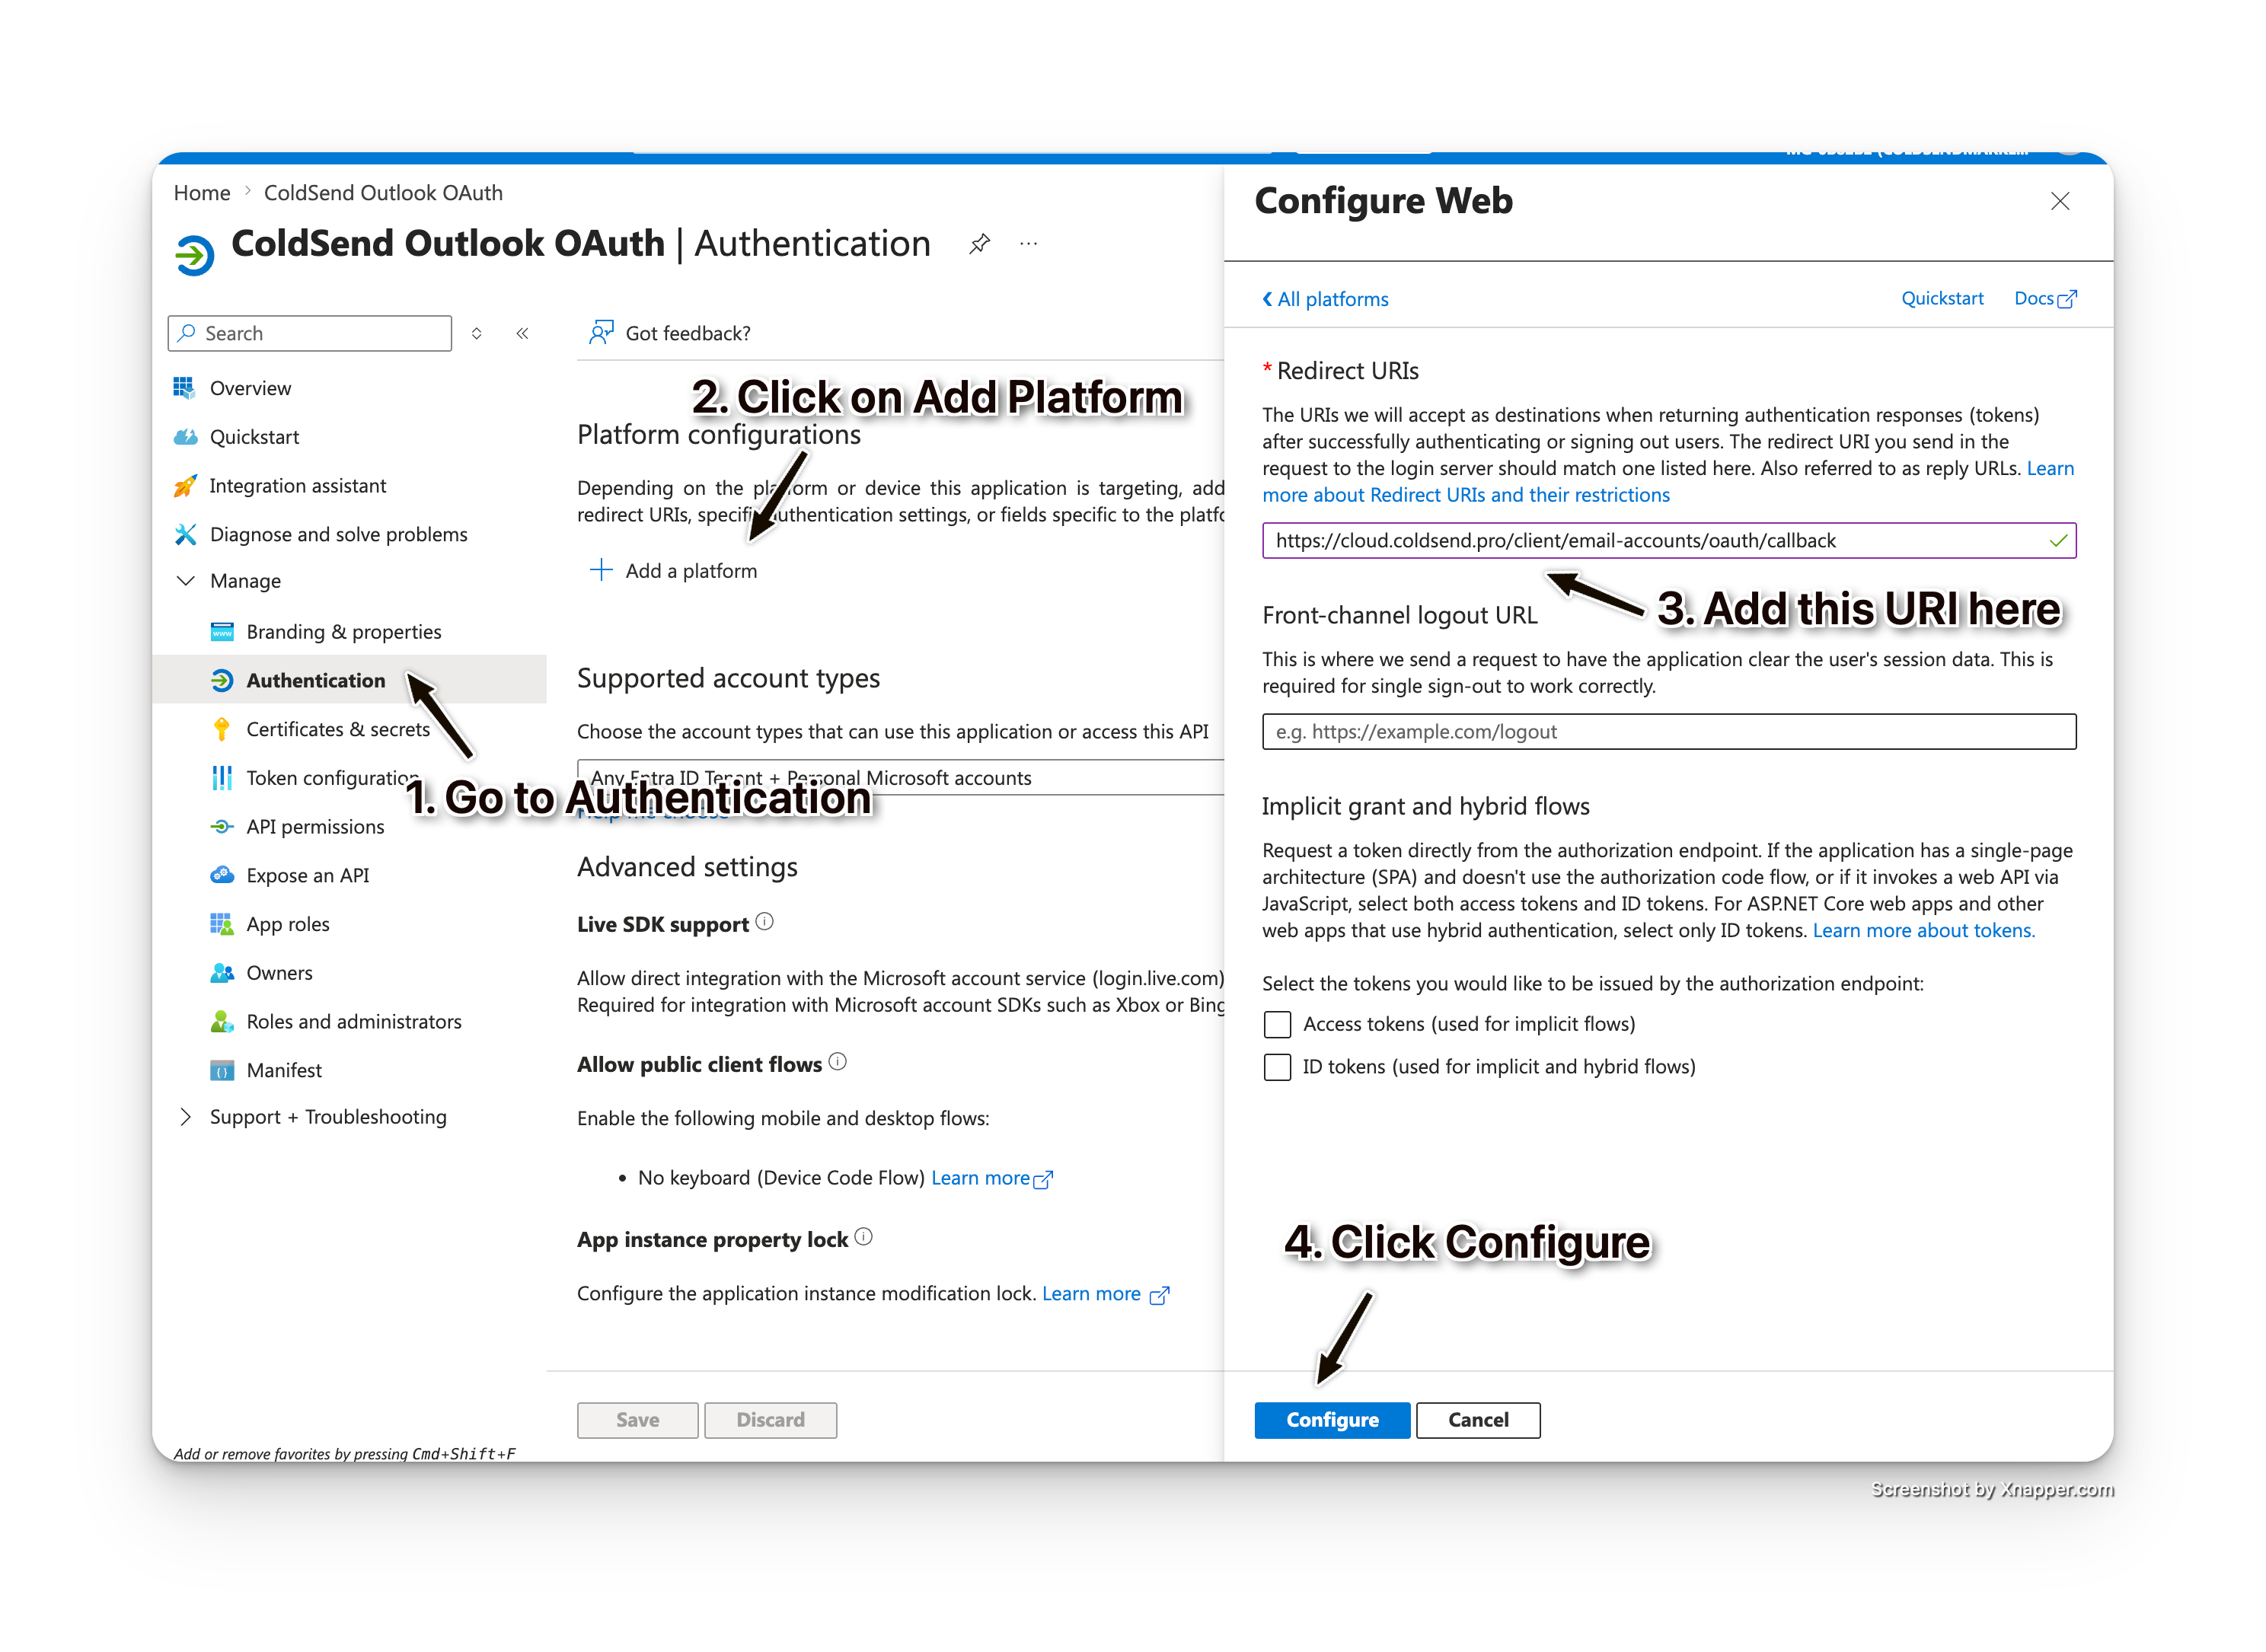
This URI is required for ColdSend to complete the OAuth handshake. Without it, Microsoft will reject the sign-in.
Step 3: Set API Permissions
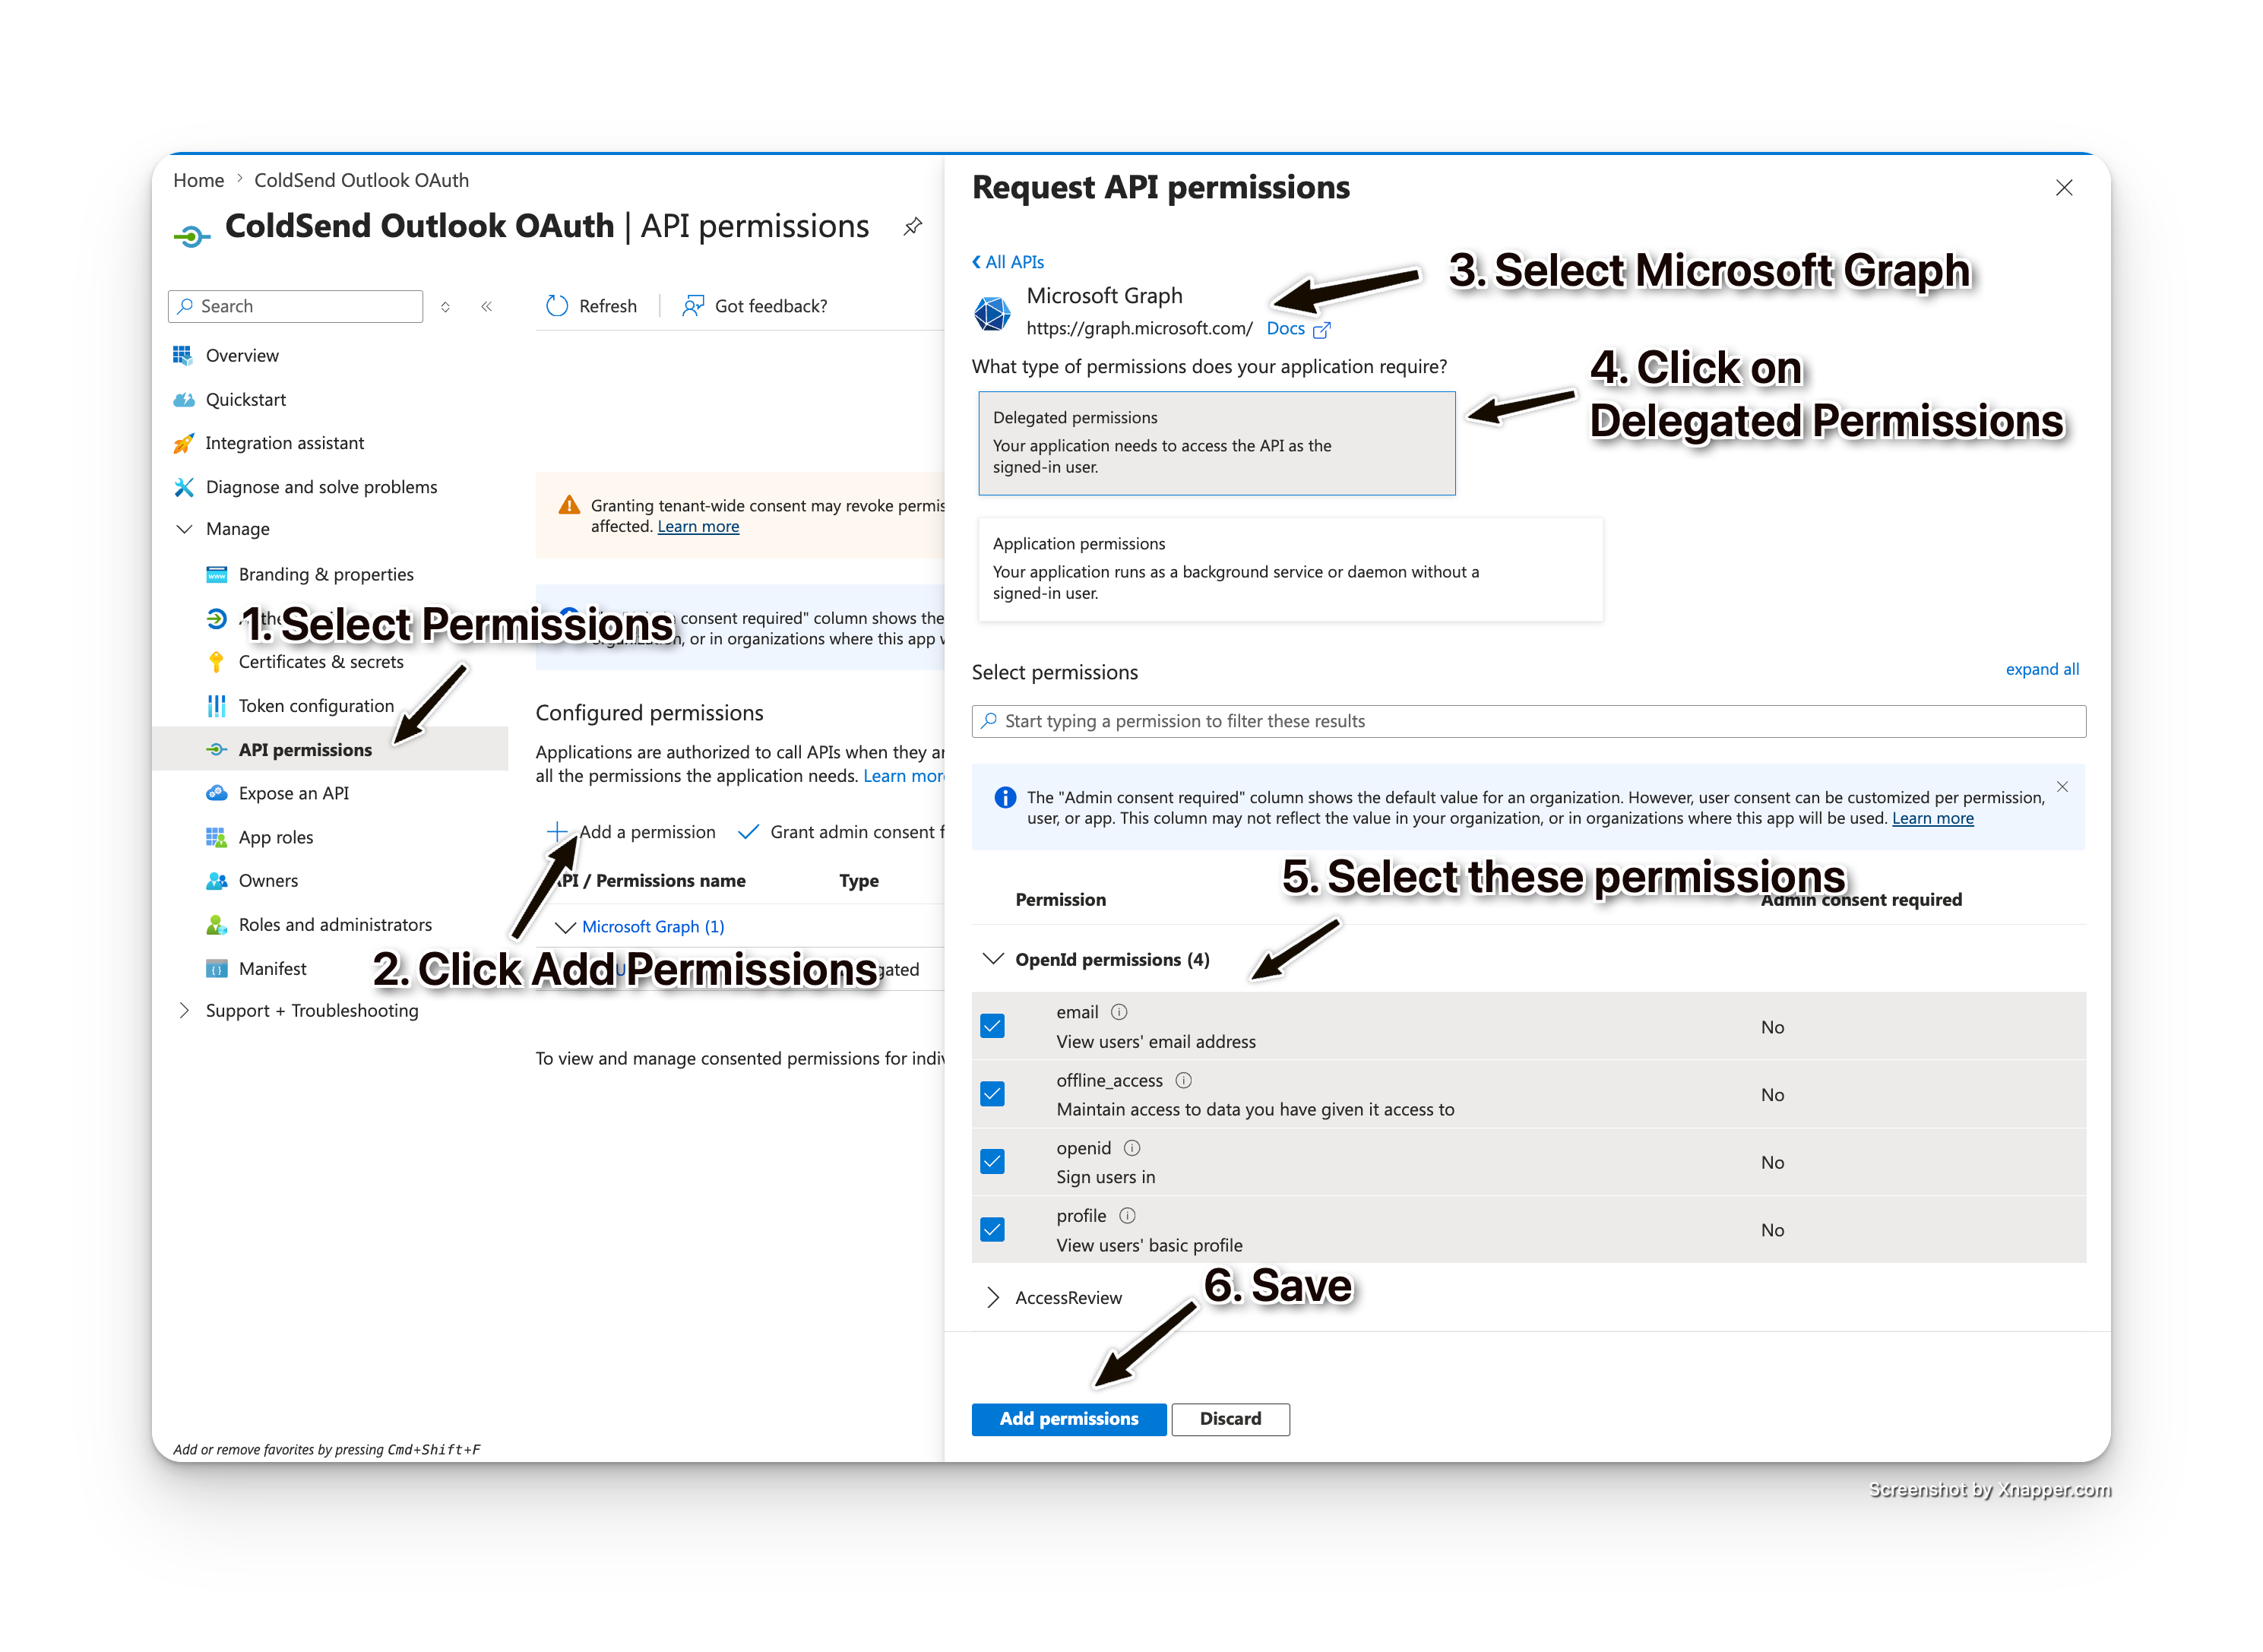
- In the left sidebar, click API permissions.
- Click + Add a permission.
- Select Microsoft Graph.
- Choose Delegated permissions.
- Search for and add the following permissions:
| Permission | Purpose |
|---|---|
offline_access |
Allows ColdSend to refresh tokens without re-prompting |
openid |
Required for OpenID Connect authentication |
email |
Read the user's email address |
profile |
Read the user's basic profile information |
User.Read |
Read the signed-in user's profile |
- Next, click + Add a permission again.
- Select APIs my organization uses.
- Search for Office 365 Exchange Online and select it.
- Choose Delegated permissions.
- Add the following:
| Permission | Purpose |
|---|---|
Mail.Send |
Send email via SMTP on behalf of the user |
Mail.ReadWrite |
Read and write mailbox for reply tracking |
Mail.ReadWrite.Shared |
Read and write shared mailboxes |
Mail.Send.Shared |
Send email from shared mailboxes |
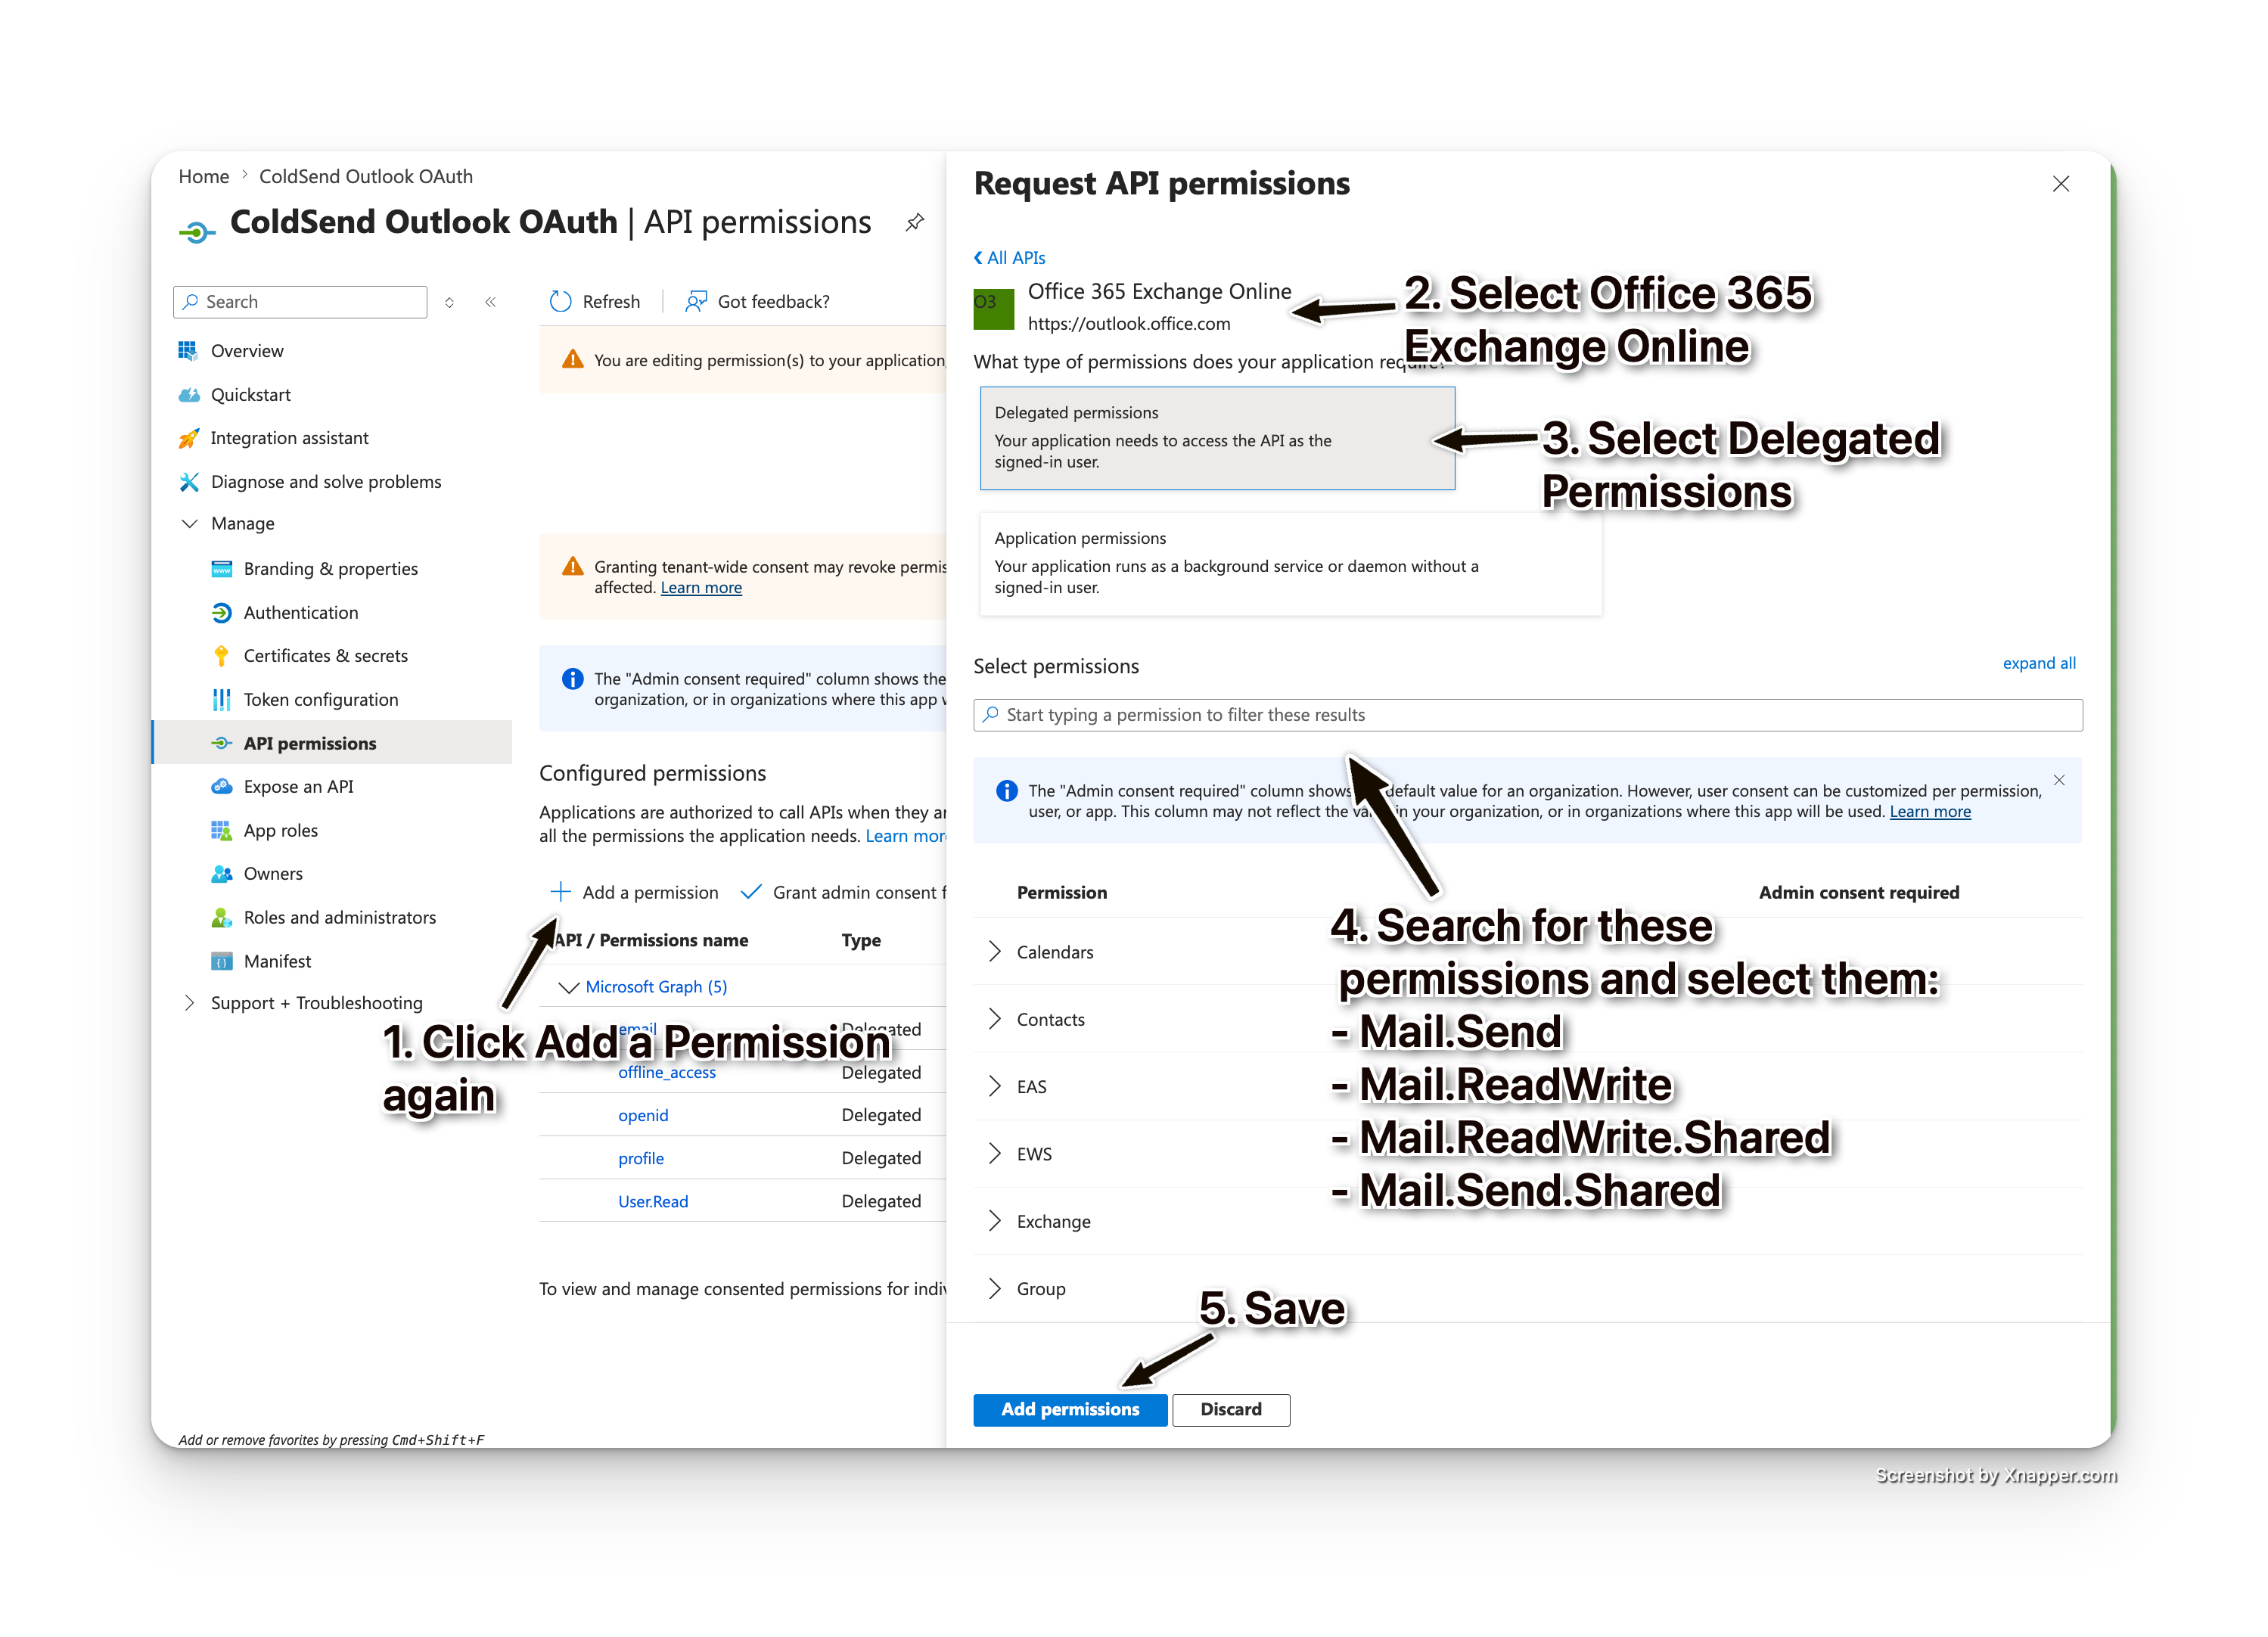
You should end up with 9 permissions total across Microsoft Graph and Office 365 Exchange Online.
- Click Grant admin consent for [Your Organization] and confirm.
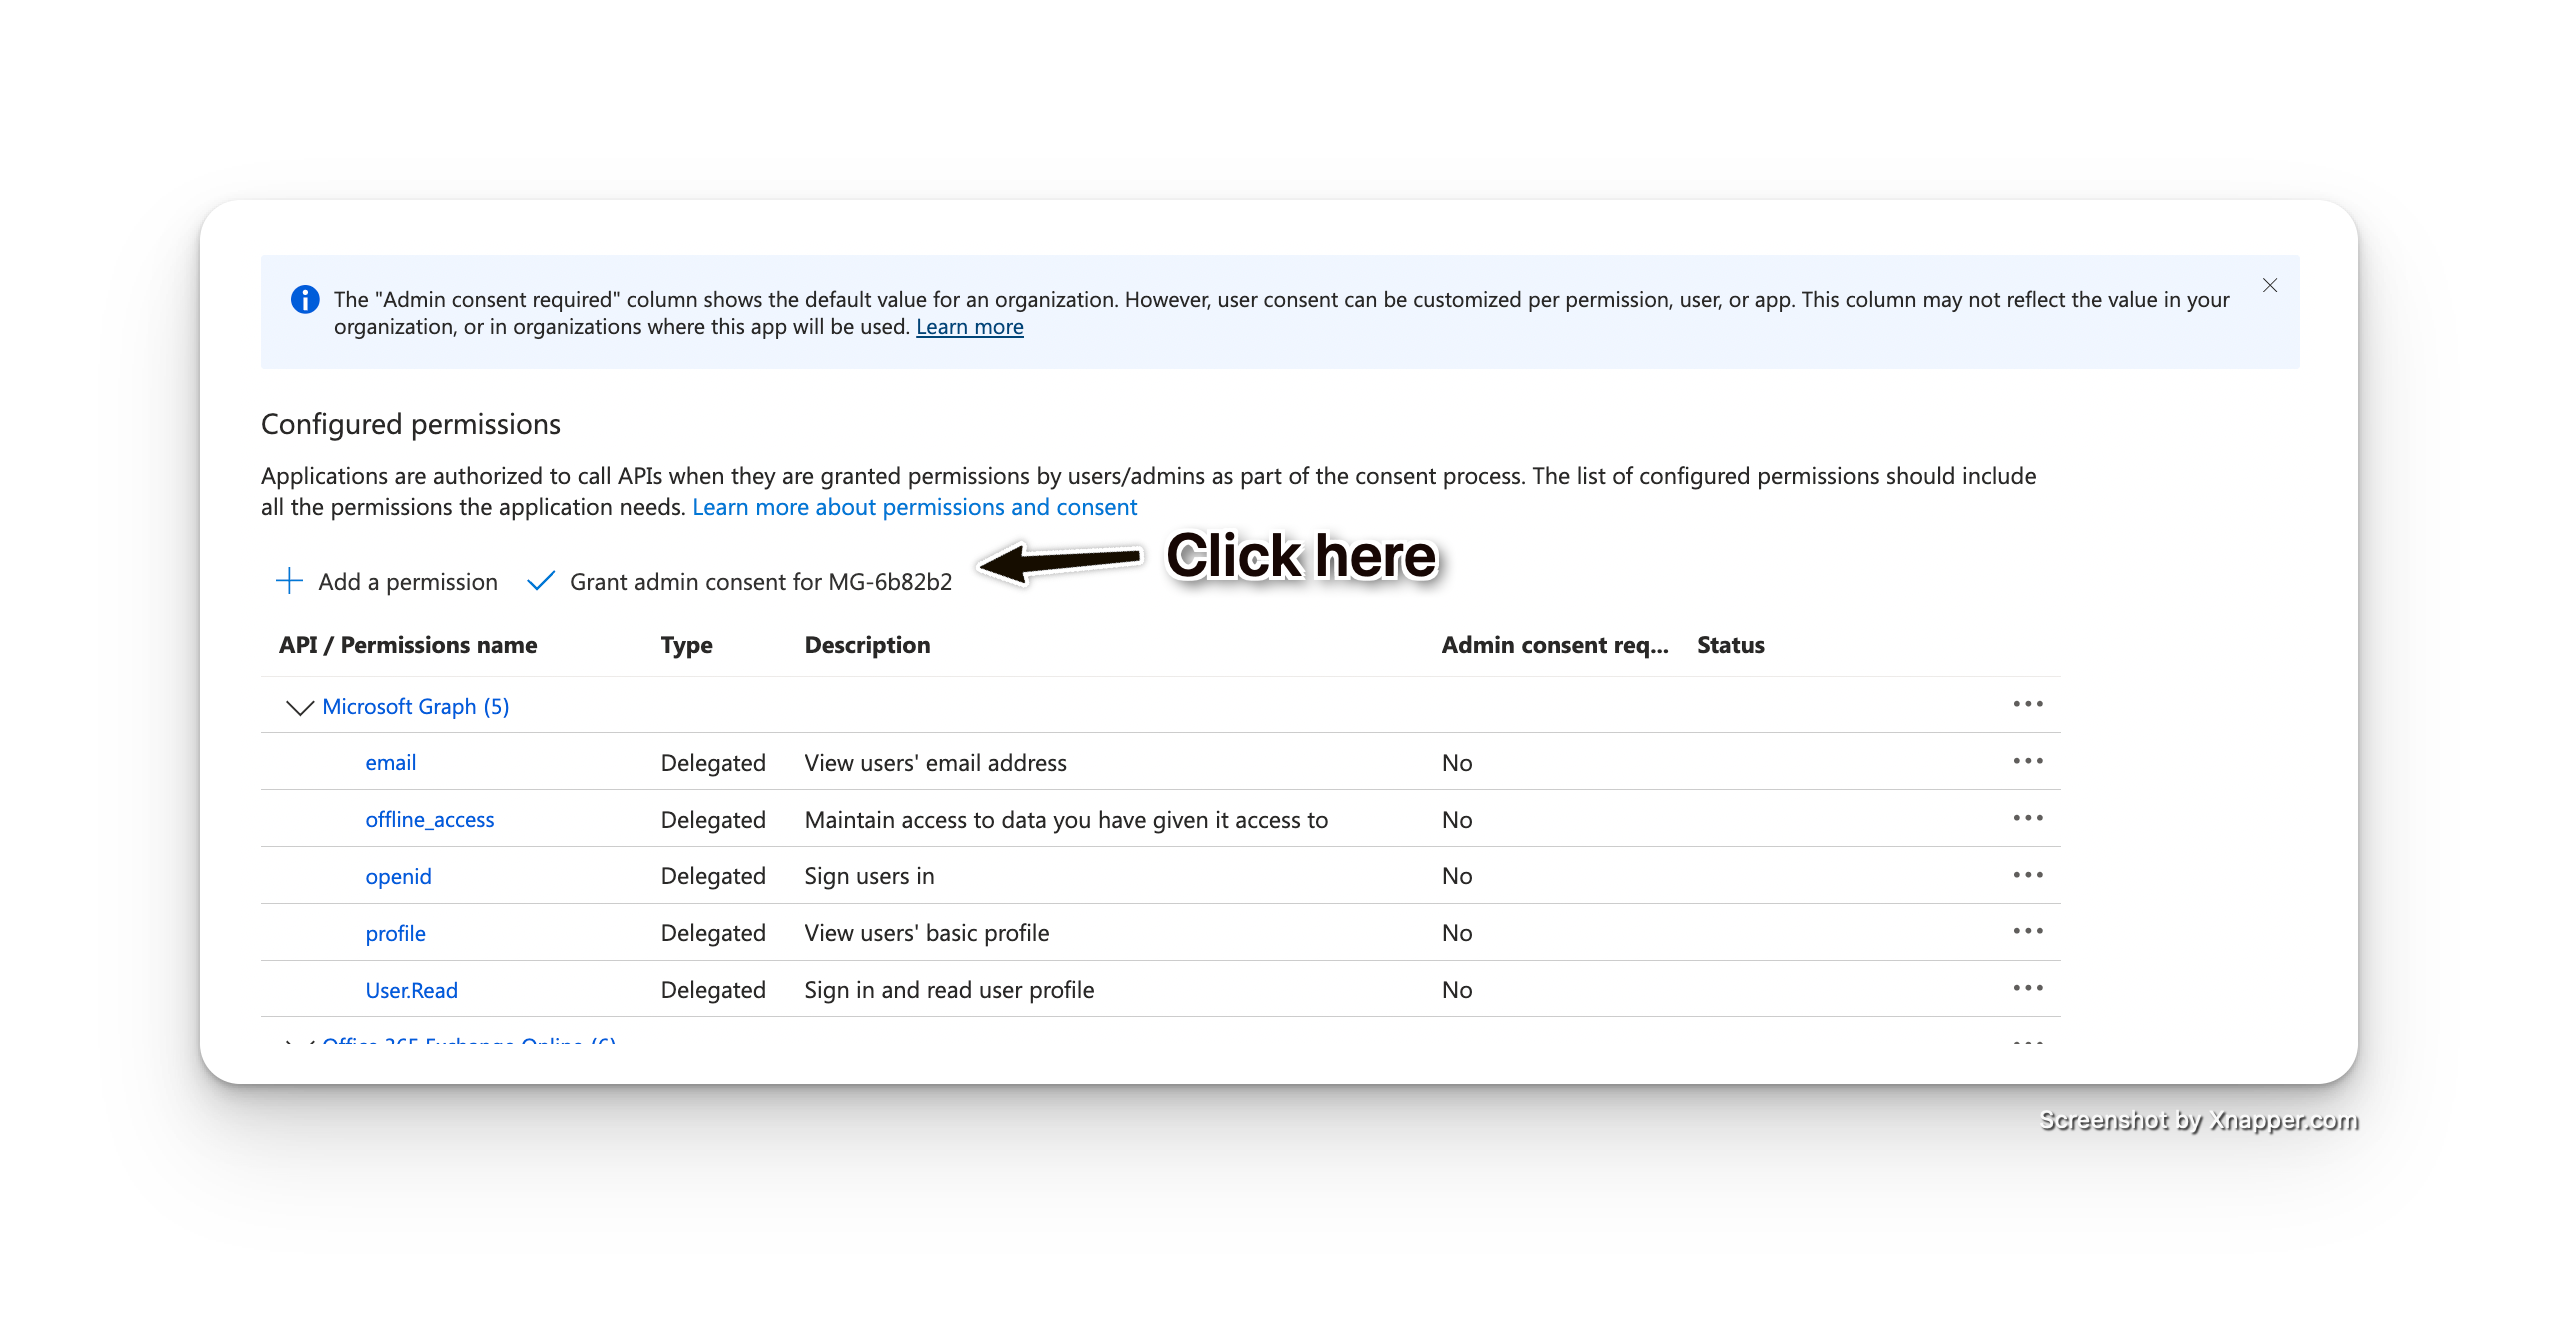
Note: If you don't see the "Grant admin consent" button, you may not have admin privileges. Ask your Azure AD administrator to grant consent.
Step 4: Generate Client Secret
- In the left sidebar, click Certificates & secrets.
- Under Client secrets, click + New client secret.
- Fill in:
- Description: e.g.,
ColdSend OAuth Secret - Expires: Choose 90 days or 180 days (recommended for safety)
- Description: e.g.,
- Click Add.
- Immediately copy the secret Value (not the Secret ID). You won't be able to see it again.
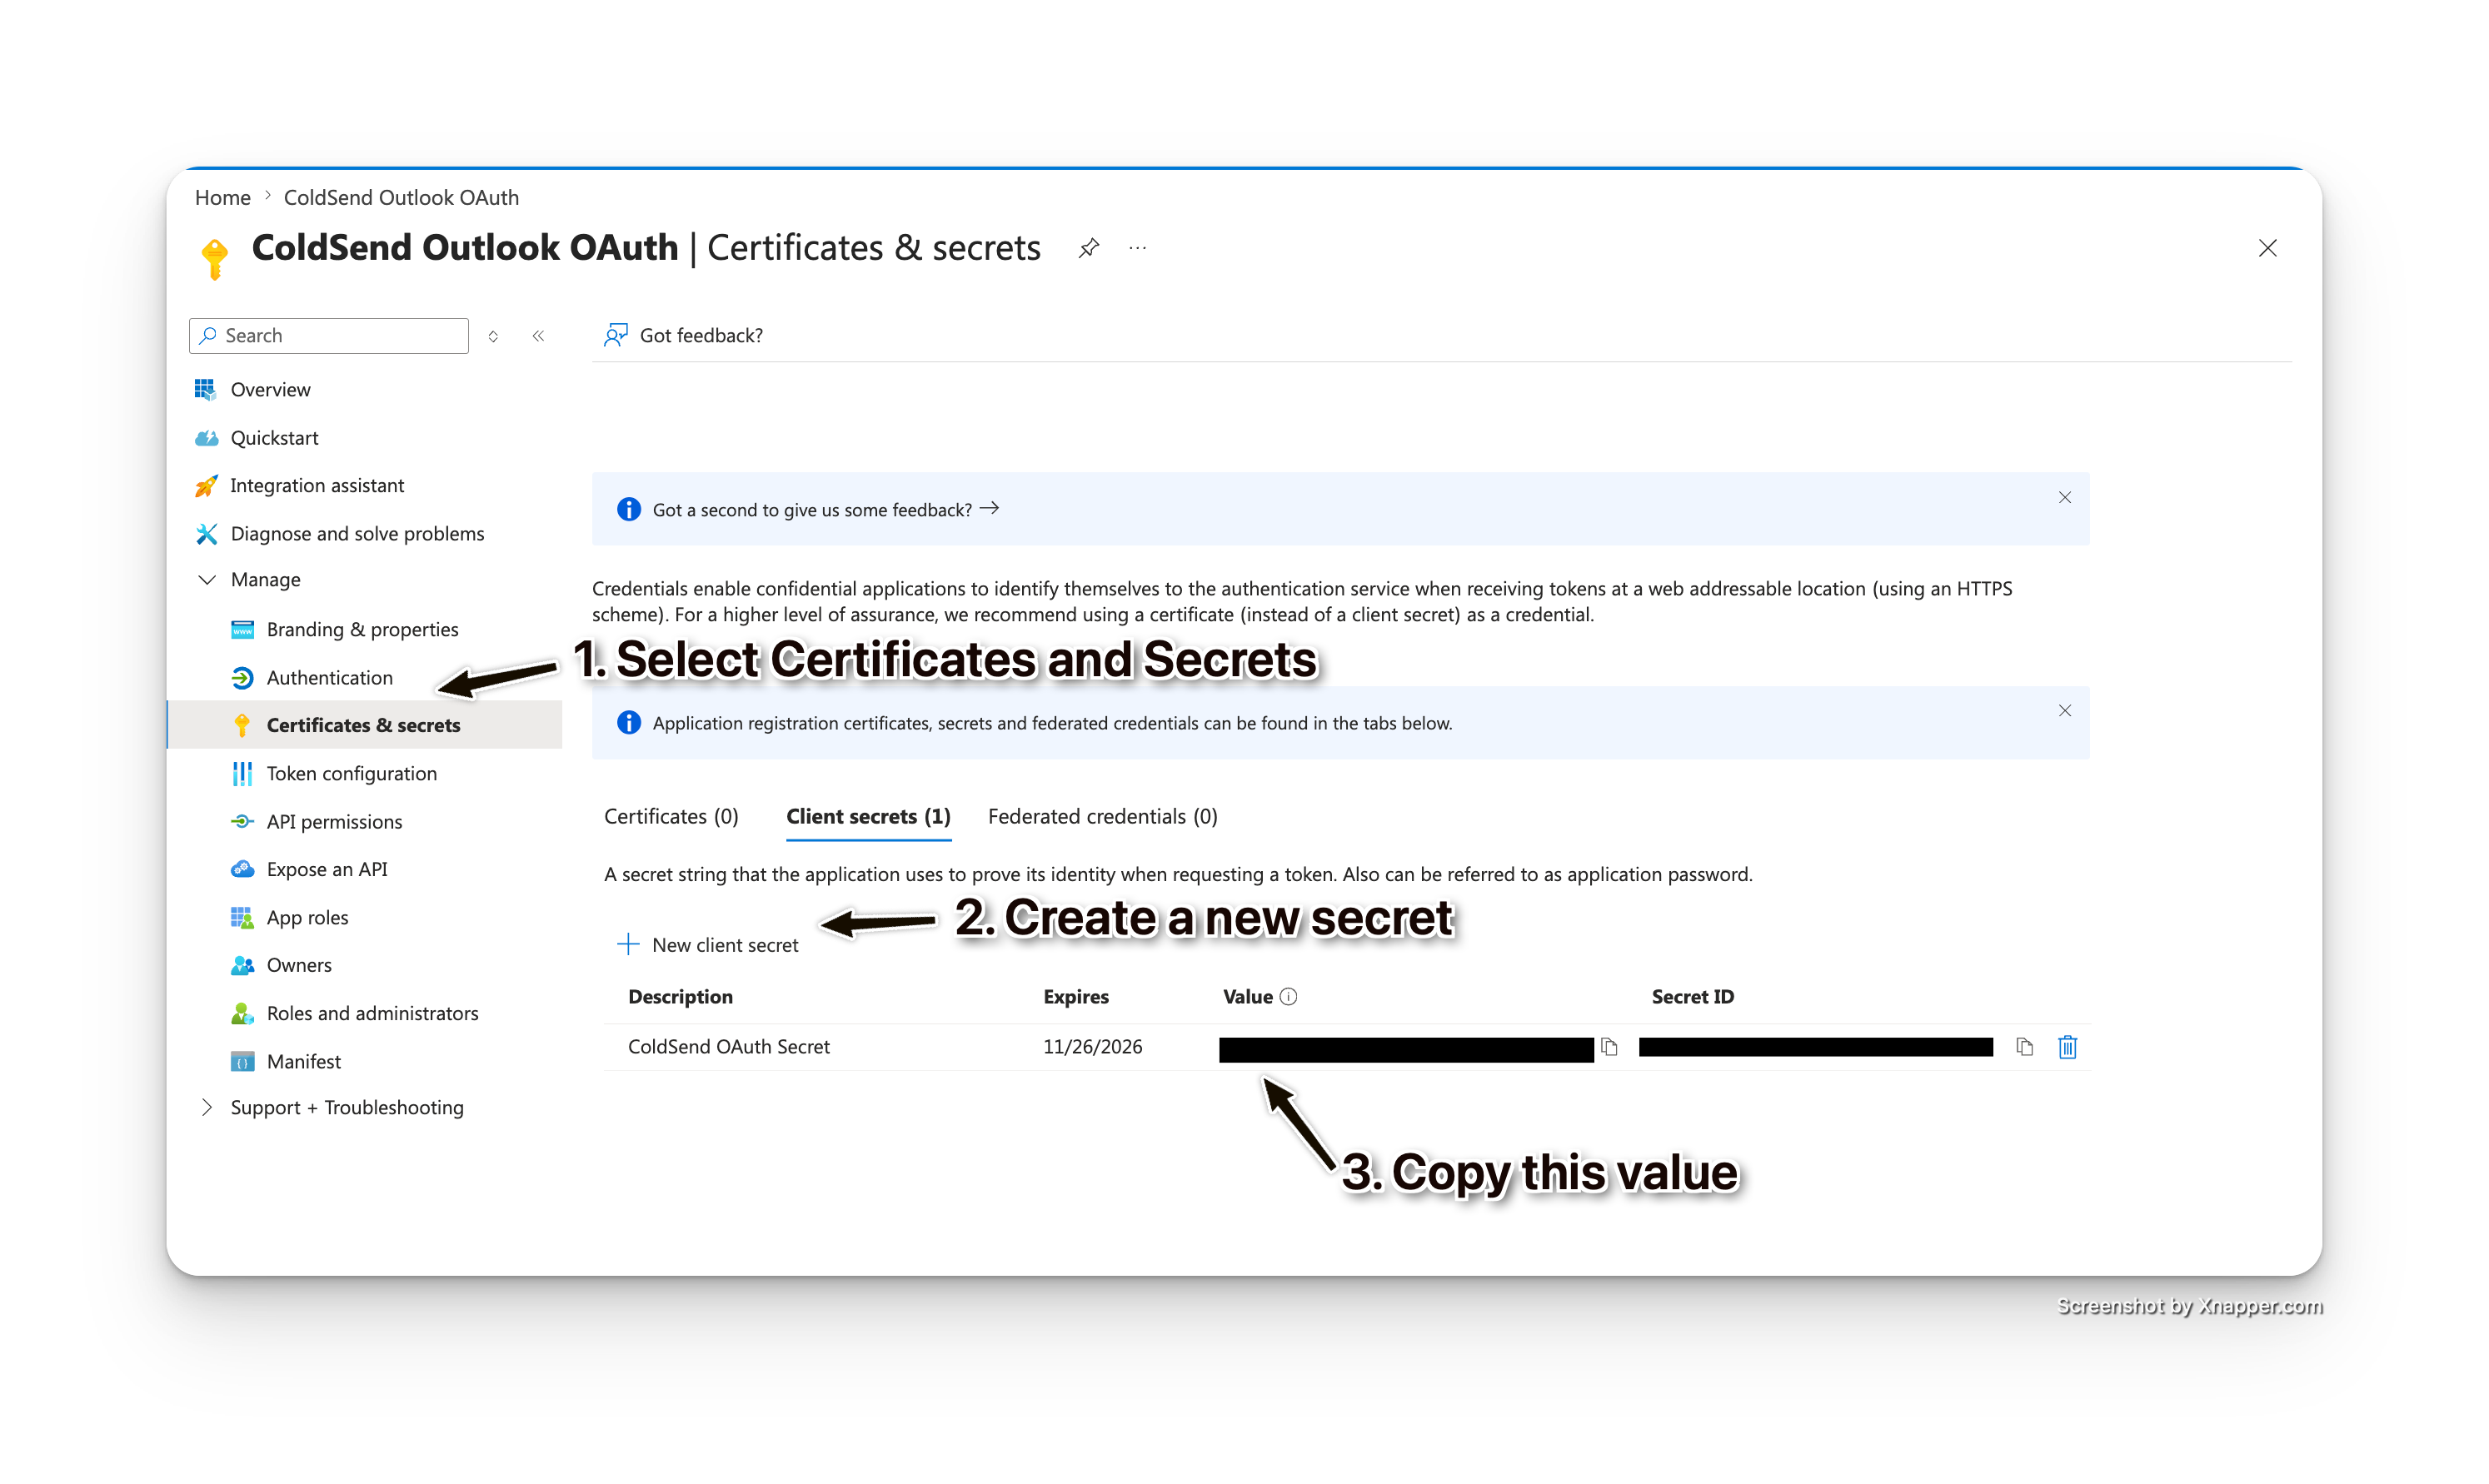
You should now have two pieces of information:
- Application (client) ID — found on the app's Overview page
- Client secret Value — the value you just copied
Step 5: Add Credentials in ColdSend
- Log into your ColdSend account.
- In the left sidebar, go to Sender Accounts.
- Click the Create Email Account dropdown and choose Microsoft Outlook.
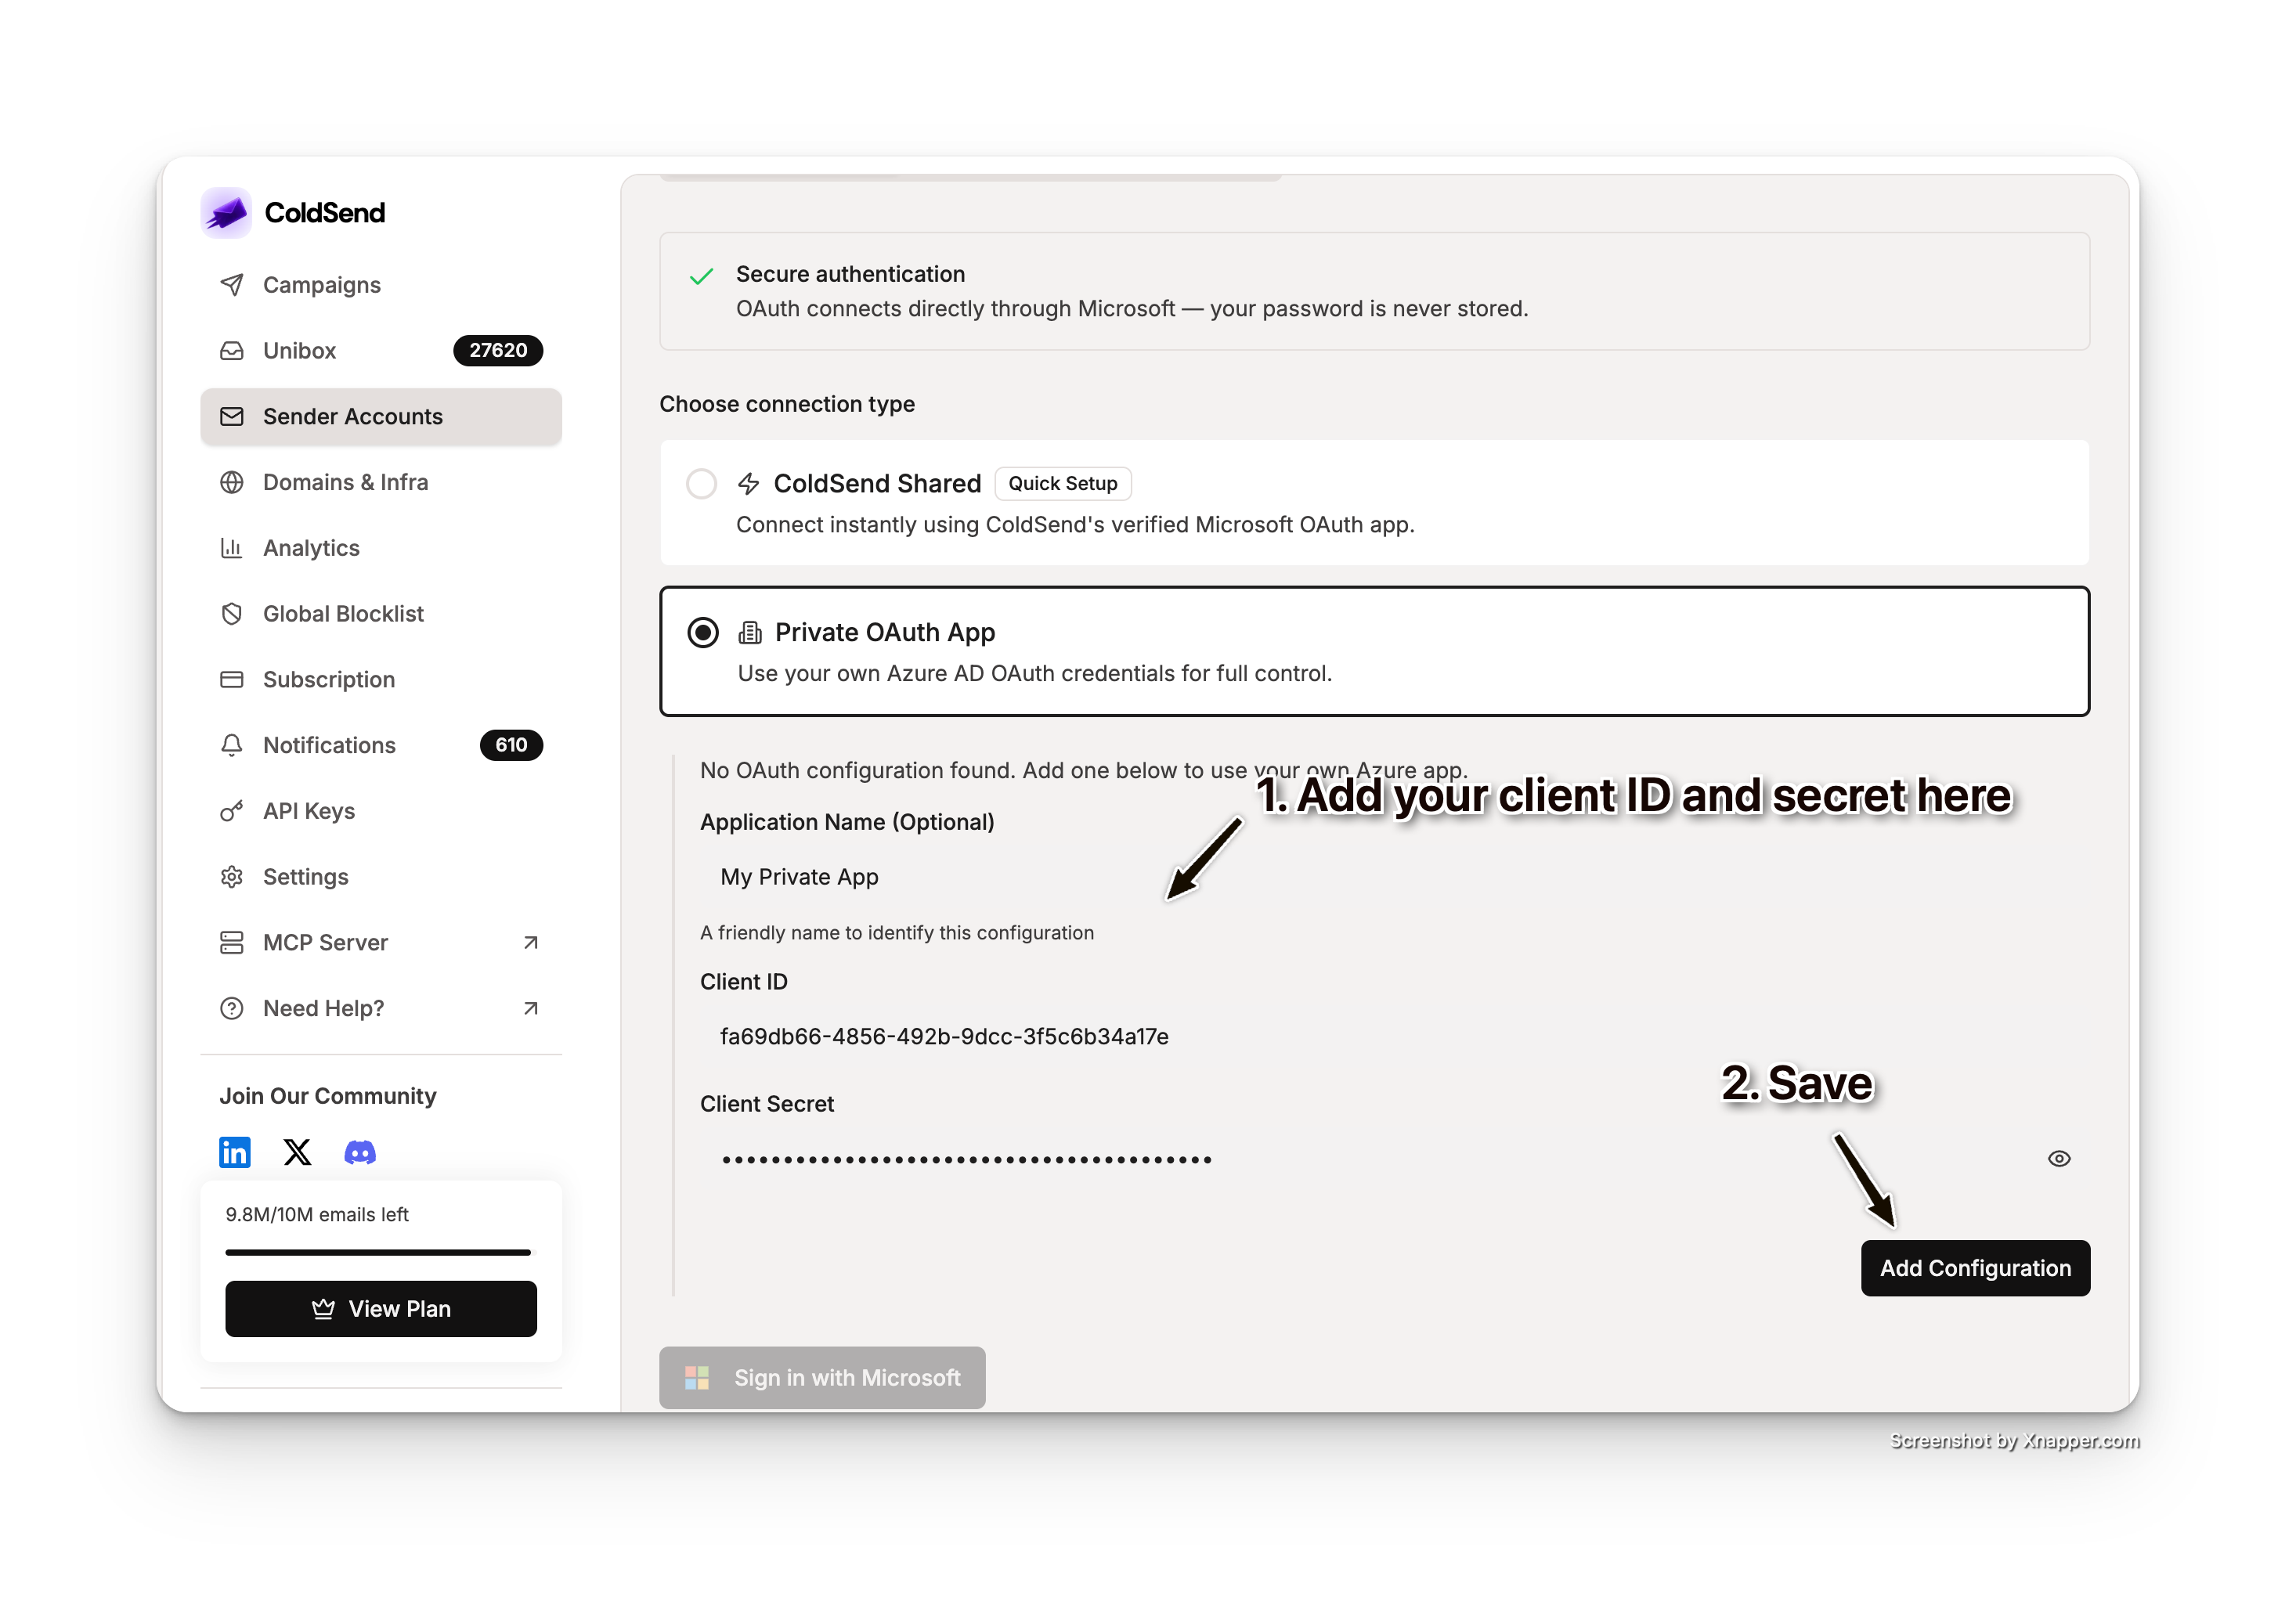
- Under Choose connection type, select Private OAuth App.
- The OAuth configuration form will appear. Fill in:
- Client ID: Paste your Application (client) ID from Azure(Can be found on the overview page of the application we just created)
- Client Secret: Paste the secret value you copied in Step 4
- App Name (optional): A friendly name like
My Company Outlook App
- Click Add Configuration.
Step 6: Verify Your Configuration
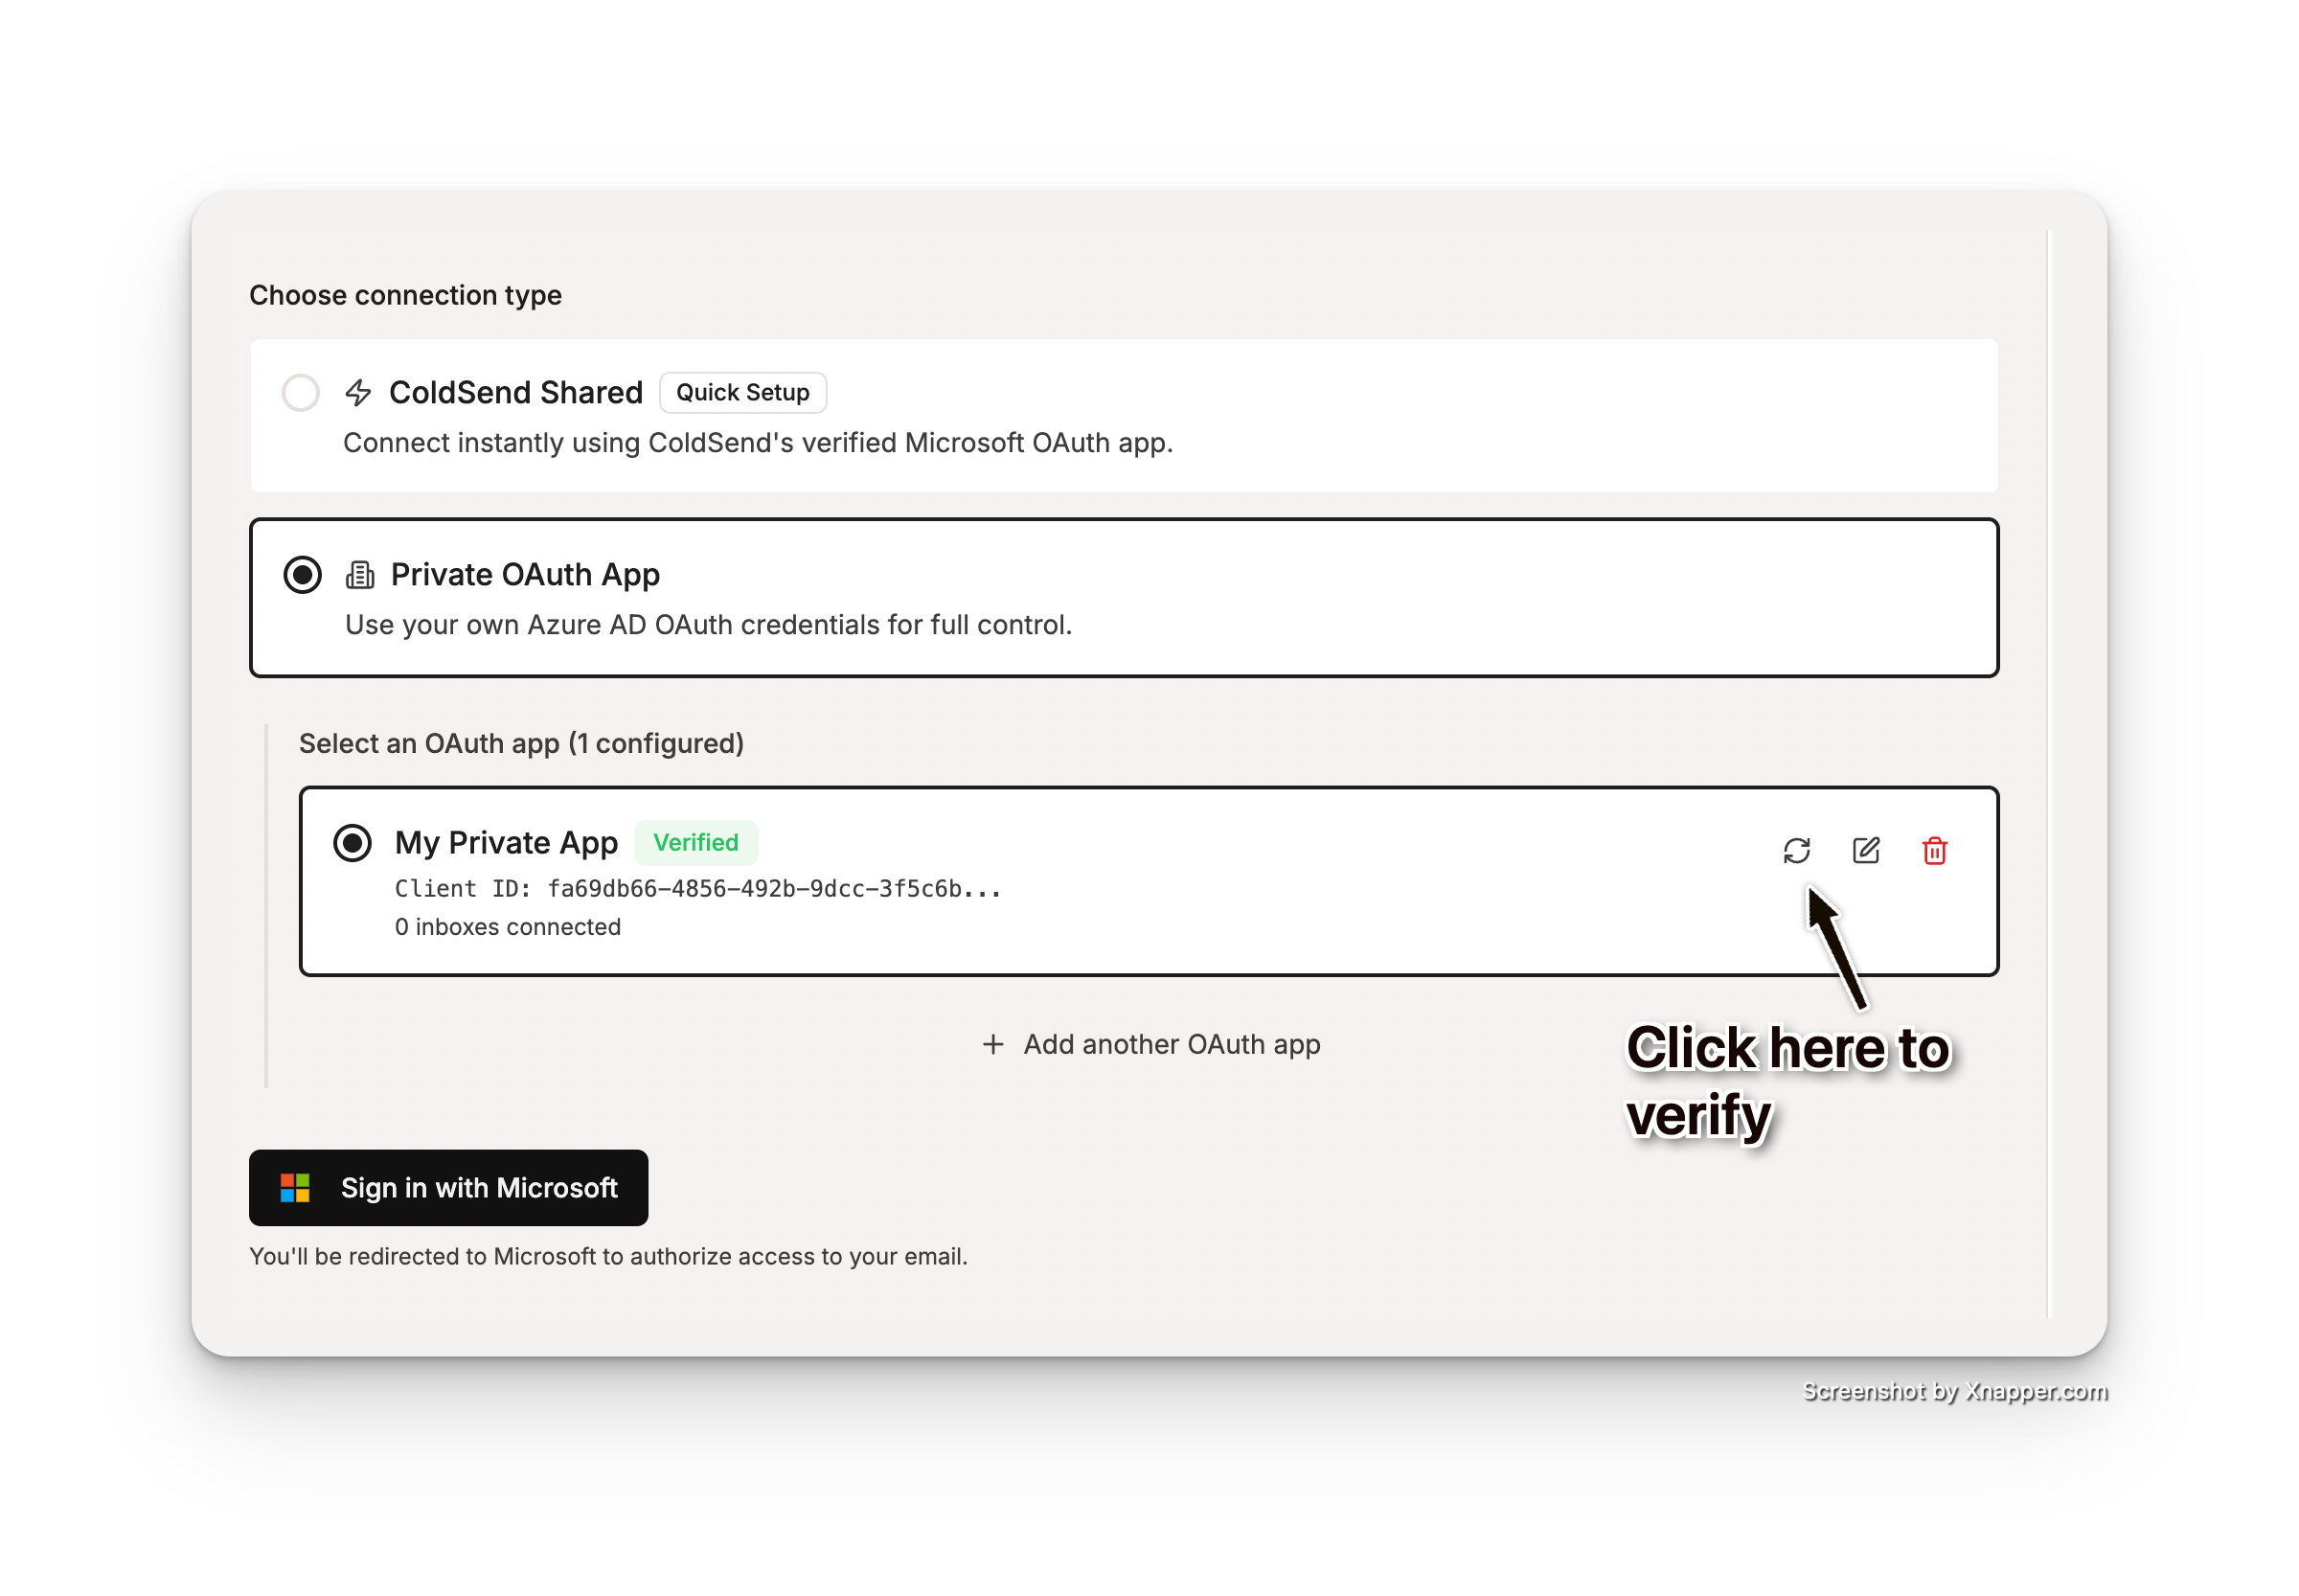
- After adding the configuration, it will appear with a Pending or Unverified status.
- Click the Verify (refresh) icon next to the configuration.
- ColdSend will test the credentials against Microsoft's token endpoint.
- On success, the status changes to Verified.

Verification failed? Double-check that:
- The Client ID matches your Azure app's Application (client) ID
- The Client Secret is the Value (not the Secret ID)
- You granted admin consent in Step 3
Step 7: Connect Mailboxes Using Your Private OAuth
- Ensure your verified configuration is selected.
- Click Sign in with Microsoft.
- You'll be redirected to Microsoft's login page — sign in with the Outlook account you want to connect.
- Review the permissions and click Accept.
- You'll be redirected back to ColdSend, and your inbox will appear in the Connected Accounts section.
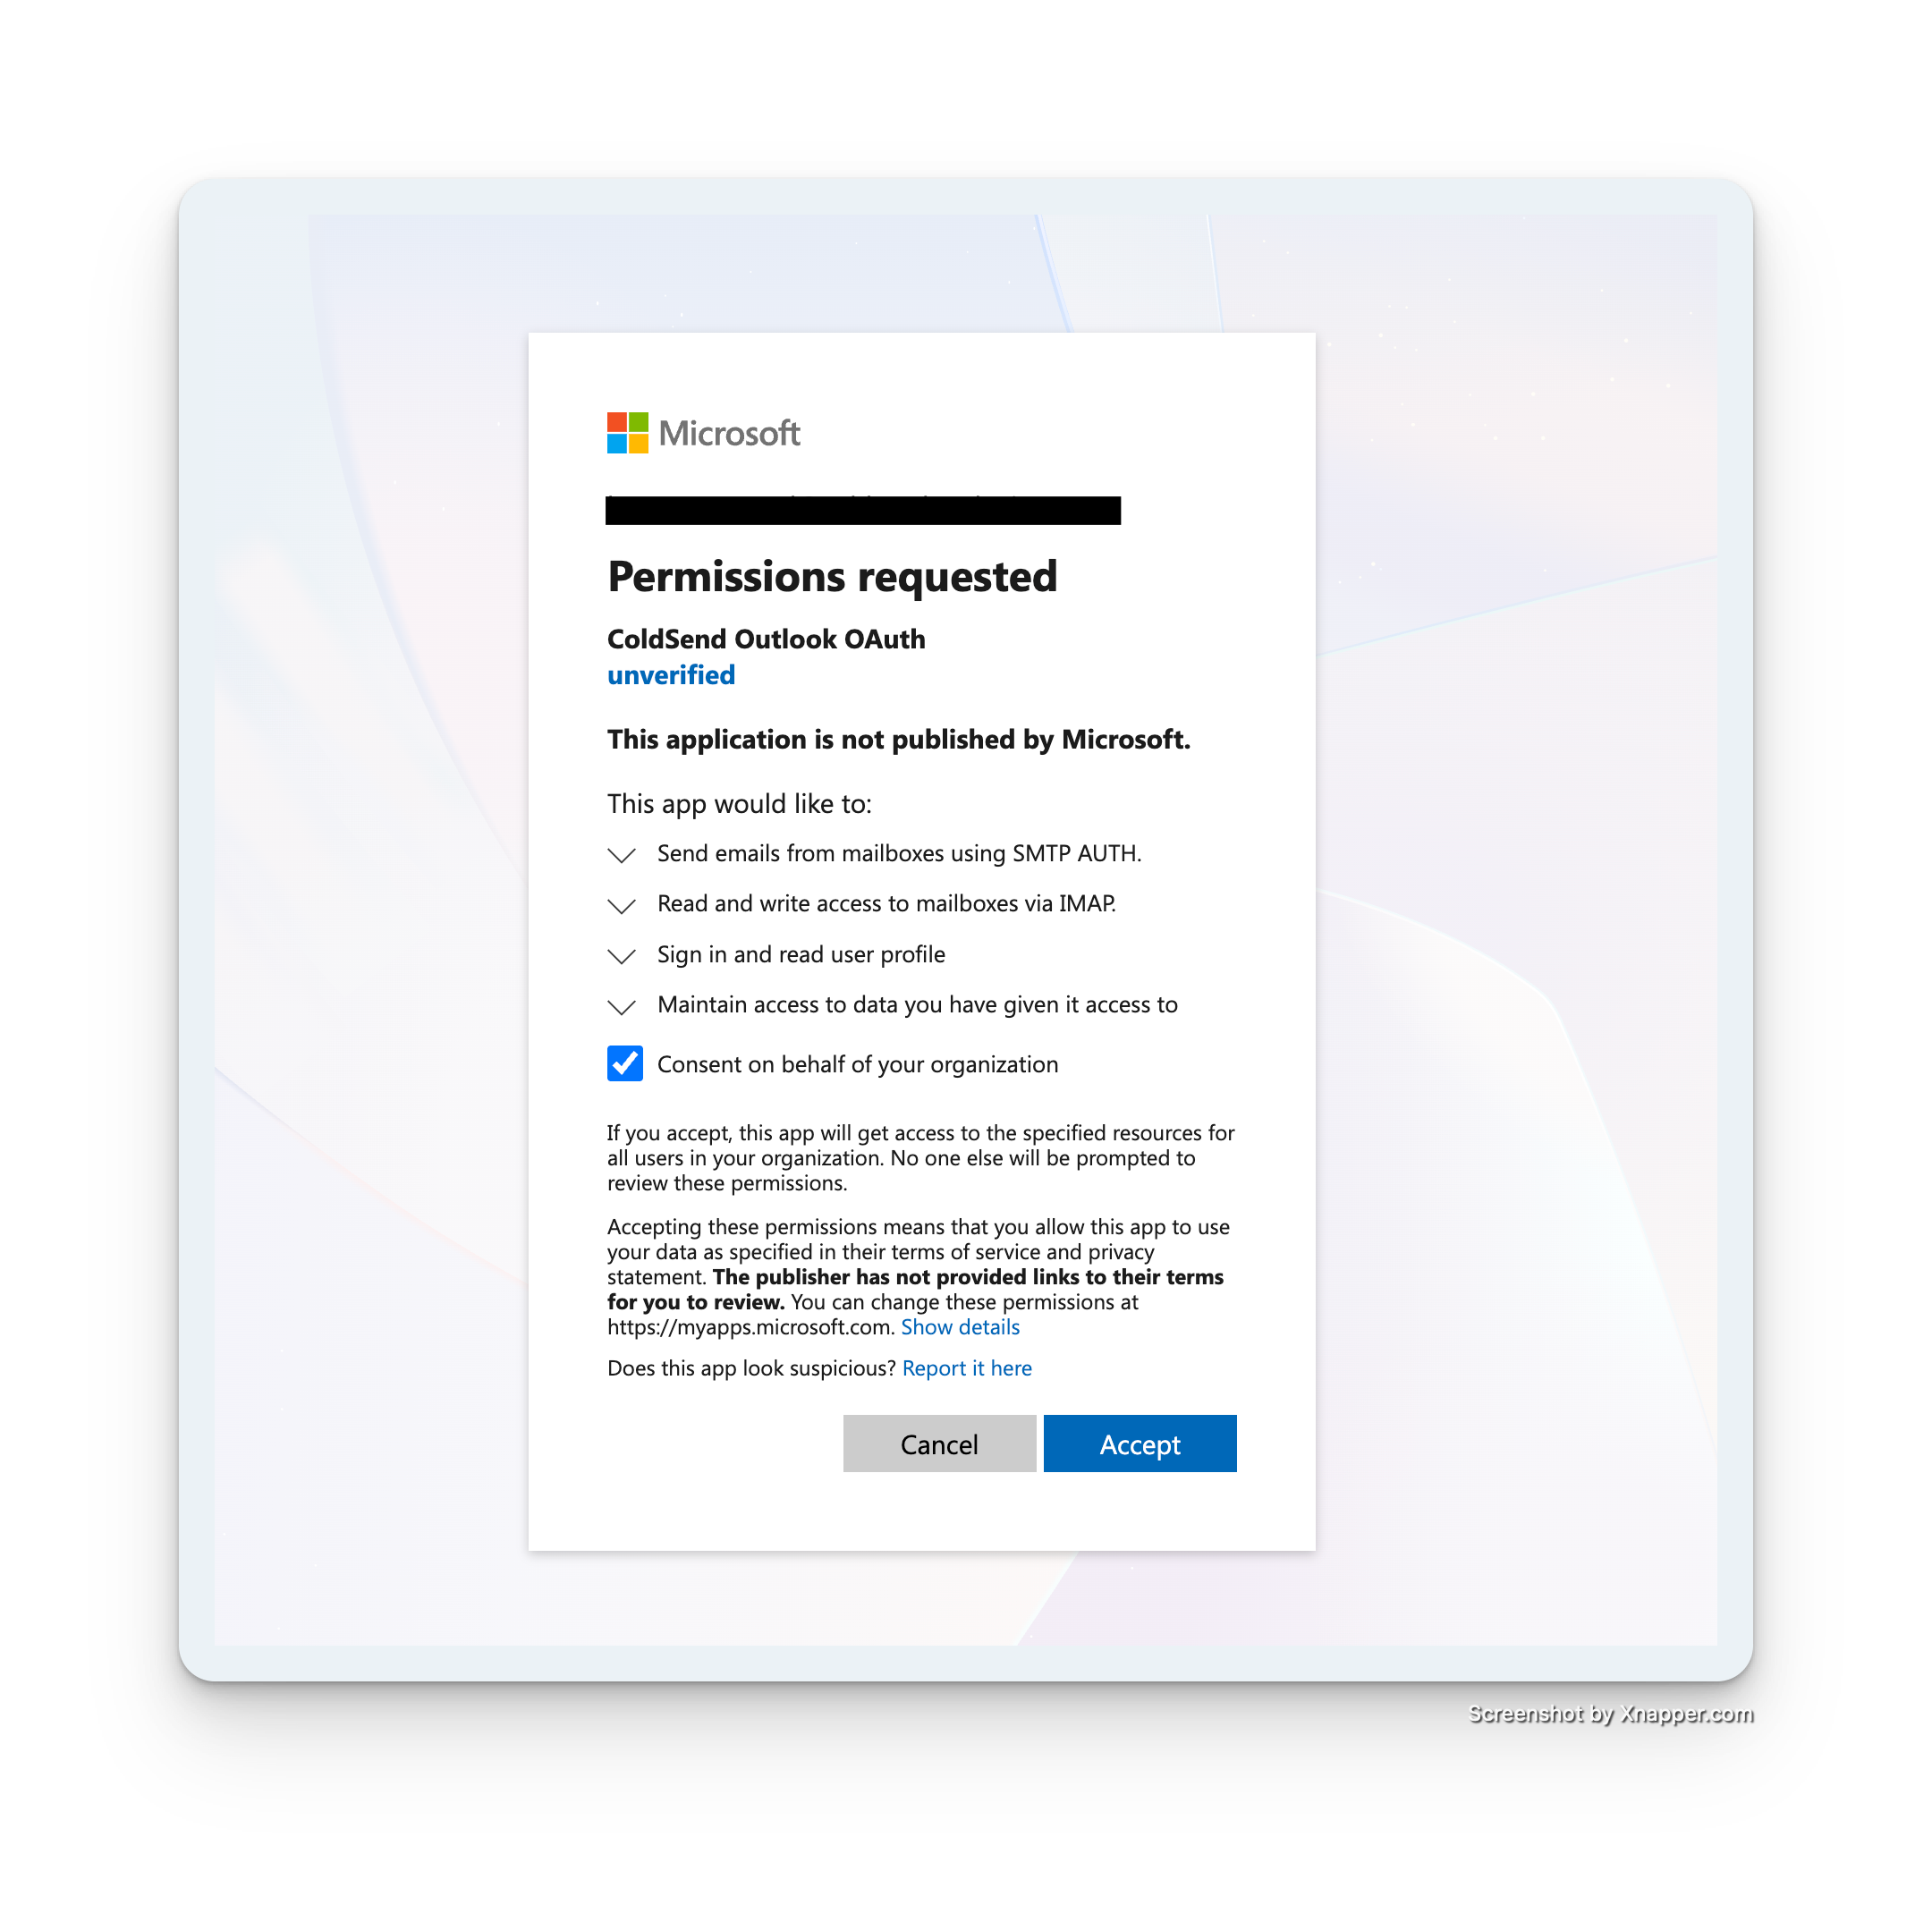
The consent screen will show your app name (not ColdSend's), providing a fully branded experience for your users or clients.
Connecting Multiple Mailboxes
Once your private OAuth app is configured and verified:
- You can connect multiple Outlook accounts using the same OAuth app
- Each user signs in with their own Microsoft credentials
- All connections use your app's Client ID for authentication
- Each inbox gets its own encrypted refresh token for independent token refresh cycles
To add more accounts, simply click Sign in with Microsoft again and authenticate with a different Outlook account.
Managing Your OAuth Configuration
Editing Credentials
If your client secret expires or you rotate it:
- Generate a new client secret in Azure Portal.
- In ColdSend, click the Edit (pencil) icon next to your configuration.
- Paste the new Client Secret and save.
- Re-verify the configuration.
Existing inboxes will continue using their current refresh tokens until they expire. New connections will use the updated credentials.
Deleting a Configuration
- Click the Delete (trash) icon next to the configuration.
- Confirm the deletion.
Warning: Existing inboxes using this configuration may fail to refresh tokens after deletion. Reconnect them using ColdSend Shared or a new private configuration.
Troubleshooting
"AADSTS50011: The redirect URI does not match"
Verify that the redirect URI in Azure exactly matches: https://cloud.coldsend.pro/client/email-accounts/oauth/callback (no trailing slash).
"AADSTS65001: The user or administrator has not consented"
Return to Step 3 and click Grant admin consent for your Azure AD tenant.
"AADSTS7000218: The request body must contain 'client_secret'"
Ensure you pasted the secret Value (from Certificates & secrets), not the Secret ID.
Verification fails in ColdSend
- Confirm your Azure app supports multitenant accounts ("Accounts in any organizational directory")
- Ensure the client secret hasn't expired
- Check that you've added both Microsoft Graph and Exchange Online permissions (9 total)
FAQs
Can I switch back to ColdSend's shared OAuth?
Yes. Delete or deactivate your private configuration, then reconnect mailboxes using ColdSend Shared. Your campaigns and sending history are unaffected.
Does ColdSend store my Client Secret?
Your client secret is encrypted at rest to manage token refreshes for your team's OAuth flow. It is never exposed in the ColdSend UI.
Why do I need Exchange Online permissions in addition to Microsoft Graph?
ColdSend requires Mail.Send, Mail.ReadWrite, Mail.ReadWrite.Shared, and Mail.Send.Shared scopes issued by the Exchange Online resource to send email and track replies — including from shared mailboxes.
Do I need to get my Azure app verified by Microsoft?
If you're only connecting mailboxes within your own organization, admin consent (Step 3) is sufficient. Microsoft app verification is only required if you plan to have external users authenticate through your app.
What happens when my client secret expires?
Existing refresh tokens remain valid, but you won't be able to connect new inboxes until you update the secret. We recommend setting a calendar reminder before expiration.
Can I use a single Azure app for both Google and Outlook?
No. Google and Microsoft have separate OAuth ecosystems. You'll need a separate Azure AD app for Outlook and a separate Google Cloud project for Google Workspace. See the Google OAuth Setup Guide for Google setup.
 1 min read
 Apr 23, 2026